今回はキャラのステータスを決めていきます。
ScriptableObjectとは
ステータスの数値を設定するためのScriptableObjectを作ります。
ScriptableObjectはオブジェクトのように扱うことができるスクリプトです。データを入力して読み込ませる時に使用します。
同じステータスを持った敵キャラなどを量産したいときなどはScriptableObjectを作成し、初期値を決めると扱いやすいです。
Inspector上で数字を書き換えることが出来るので、デバッグ中でもデータの変更ができるので使いやすいです。
沢山のオブジェクトを配置する際には、それぞれのオブジェクトのスクリプト上で変数を宣言するよりScriptableObjectでまとめた方がメモリを節約できるようです。
ScriptableObjectを作る
ScriptフォルダにCreate>C#Scriptを選択、名前を”StatusData”にします。
ScriptableObjectを作るためのScriptです。
using System.Collections;
using System.Collections.Generic;
using UnityEngine;
[CreateAssetMenu(menuName = "Data/Create StatusData")]
public class StatusData : ScriptableObject
{    public float MAXHP; //最大HP
    public float ATK; //攻撃力
    public float SPEED; //移動速度
    public float NockBack; //のけぞり
    public float SPAN; //間隔
    public int EXP; //経験値
}
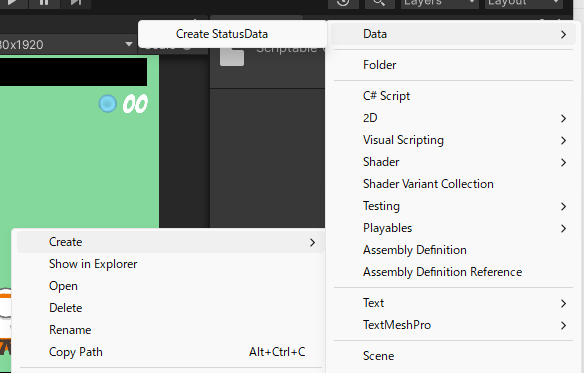
上記の内容でScriptを記入したら、次はScriptableObjectsという名前のフォルダをAssetsの下に作成しましょう。
そのフォルダの下で右クリック>CreateをクリックするとDataという項目が増えていると思います。更にData>Create StatusData をクリックして名前をPlayerStatusにします。
PlayerStatusの数値を設定していきます。
MAXHPの項目に100
ATKの項目に1
SPEEDの項目に2
を入力しましょう。(今使うデータだけ先に入力しました)
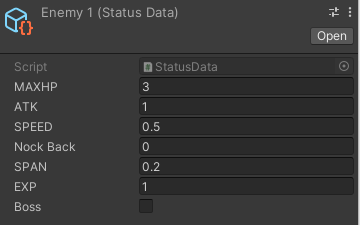
続いてもう一つStatuDataを作成し、名前をEnemy1にします。
MAXHPを3
ATKを1
SPEEDを0.5に設定します。
SPANを0.2にします。
EXPを1にします。
作成したScriptableObjectを早速利用していきましょう。
PlayerScriptとEnemyScriptを書き換えて、インスペクターにアサインしていきます。
using System.Collections;
using System.Collections.Generic;
using UnityEngine;
public class PlayerScript : MonoBehaviour{
[SerializeField] StatusData statusdata;//☑
void Start(){}
 void Update()
    {
        if (Input.GetKey(KeyCode.UpArrow)) {//矢印上が押されている時に実行される
            if (this.transform.position.y < 5)  {
                transform.position += new Vector3(0, statusdata.SPEED * Time.deltaTime, 0);//☑
            }
        }
        if (Input.GetKey(KeyCode.DownArrow)){//矢印下が押されている時に実行される
            if (this.transform.position.y > -5) {
                transform.position += new Vector3(0, -1* statusdata.SPEED * Time.deltaTime, 0);//☑
            }
        }
        if (Input.GetKey(KeyCode.LeftArrow)) {//矢印左が押されている時に実行される
            if (this.transform.position.x > -3) {
                worldAngle.y = 0f;//通常の向き
              this.transform.localEulerAngles = worldAngle;//自分の角度に代入する
              transform.position += new Vector3(-1 * statusdata.SPEED * Time.deltaTime, 0, 0);//☑
            }
        }
        if (Input.GetKey(KeyCode.RightArrow)) {//矢印右が押されている時に実行される
            if (this.transform.position.x < 3) {
                worldAngle.y = -180f;//右向きの角度
              this.transform.localEulerAngles = worldAngle;//自分の角度に代入
              transform.position += new Vector3(statusdata.SPEED * Time.deltaTime, 0, 0);//☑
            }
  }
移動スピードをStatuDataで設定したSPEEDに置き換えました。
using System.Collections;
using System.Collections.Generic;
using UnityEngine;

public class EnemyScript : MonoBehaviour
{
GameObject Player;
Vector3 PlayerPos;
[SerializeField] StatusData statusdata;//☑

~省略~
 void Update(){
	PlayerPos= Player.transform.position;//プレイヤーの現在位置を取得
	transform.position = Vector2.MoveTowards(transform.position, PlayerPos, statusdata.SPEED * Time.deltaTime);//現在位置からプレイヤーの位置に向けて移動

~省略~
こちらも移動スピードをStatuDataで設定したSPEEDに置き換えました。
PrefabからEnemy1のInspectorを開いてアサインしましょう。
デバッグしてみて今までと同じように動いていれば成功です。
SPEEDの数値を0のままにしていると移動しなくなってしまうので注意してください。
次回はプレイヤーのHPを表示するUIを作っていきます。


コメント