UnityでVampire survivers 風のゲームを作ろう!#0【連載目次】
聖水の実装
今回は敵にダメージを与えるエリアを発生させる聖水を実装していきます。
・ampouleGenerator(聖水を生成させるオブジェクト)
・ampoule(聖水の瓶)
・DamageZone(ダメージエリア)
DamageZone→ampoule→ampouleGeneratorの順で作成していきます。
DamageZoneを実装していきます。まずはヒエラルキー上で右クリック、Create>2DObject>sprites>Circleを選択します。
名前をDamageZoneにします。
ScaleはX1.6 Y1.6にします。当たり判定として利用するのでAddComponentからCircleCollider2Dを追加します。
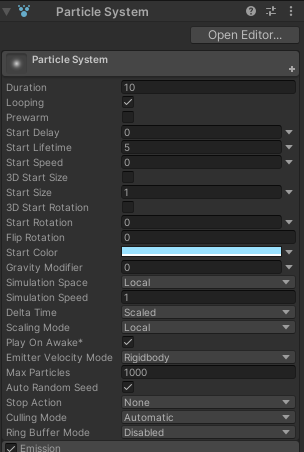
ダメージエリアのエフェクトとして、ヒエラルキー上で右クリックCreate>Effects>Particle Systemを作成します。
Duration 10
Loop ☑
Start Speed 0
Color #9CE2FF
ShapeからShape をSphereにします。
Start Speedを0にすることで、パーティクルがその場にとどまるので、あたり判定が視覚的に分かりやすくなります。

Particle SystemをDamageZoneの子要素にしてください。
DamageZoneに読み込ませるスクリプトを書いていきます。
持たせる機能としては
・ダメージエリアに重なっている敵にダメージを与える
・一定時間後に自壊する
の二つです。
using System.Collections;
using System.Collections.Generic;
using UnityEngine;

public class DamageZone : MonoBehaviour
{
    // Start is called before the first frame update
    void Start()
    {
        StartCoroutine("SelfDestroy");
    }

    // Update is called once per frame
    void Update()
    {

    }

    void OnTriggerStay2D(Collider2D other)//敵と重なっている時ダメージ関数を発動
    {
        if (other.gameObject.tag == "Enemy")
        {
            other.gameObject.GetComponent<EnemyScript>().Damage(0.1f);
            Debug.Log("ダメージエリアに入っています");
            other.gameObject.GetComponent<EnemyScript>().NockBack(1f);
        }
    }

    IEnumerator SelfDestroy()
    {
        yield return new WaitForSeconds(5f);
        Destroy(this.gameObject);
    }
}OnTriggerStay2Dはオブジェクト同士が触れている間ずっと処理が行われます。
持続ダメージを与えるので、一回あたりのダメージは少なくしておきましょう。
スタート関数にコルーチンを使い、5秒で自壊するようにしてあります。
続いてはampouleのオブジェクトを作っていきます。
Imagesフォルダから、ampouleをヒエラルキー上にドラッグ&ドロップします。
続いて、Scriptsフォルダの中にampouleScriptというSctiptを作成します。
このスクリプトに持たせる機能は
・画面の中のランダムな地点に向かって聖水入りの瓶を落とす
・その地点に到達した時、DamageZoneを生成して自壊する
の二つです。
using System.Collections;
using System.Collections.Generic;
using UnityEngine;

public class AnpouleScript : MonoBehaviour
{
    Vector2 DestinationPos;
    Vector2 currentPos;
    [SerializeField] GameObject DamageZonePrefab;
    Vector3 localAngle;
    Transform myTransform;
    // Start is called before the first frame update
    void Start()
    {
        float rndPosX = Random.Range(-2.6f, 2.61f);//画面の横の長さ
        float rndPosY = Random.Range(-4.5f, 4.51f);//画面の縦の長さ
        currentPos.x = rndPosX;//ランダム値を代入する
        currentPos.y = 6f;//Y軸を表示範囲よりも上に設定しておく
        transform.position = currentPos;//現在位置を変える
        DestinationPos = transform.position;//目的値のX軸を代入
        DestinationPos.y = rndPosY;//目的値のY軸を代入


 	myTransform = this.transform;
        localAngle = myTransform.localEulerAngles;
    }

    // Update is called once per frame
    void Update()
    {
        localAngle.z += Time.deltaTime*80;//Z軸に回転をさせる
        myTransform.localEulerAngles = localAngle;//角度を代入

        transform.position = Vector2.MoveTowards(transform.position, DestinationPos, 4*Time.deltaTime);
        currentPos = transform.position;
        if (currentPos.y== DestinationPos.y) {//目的地に到達したらDamageZoneを生成する
            var DamageZone = Instantiate(DamageZonePrefab, transform.position, transform.rotation);
            Destroy(this.gameObject);
        }

    }
}
今まで実装してきた処理と似たようなものなので、結構簡単だったかもしれません。
ランダムで場所を決めるのはEnemyGeneratorで、ある地点に向かわせるのはEnemyScriptと同じですよね。
AnpouleにAnpouleScriptを読み込ませます、
InspectorにPrefabフォルダからDamegeZone PrefabにDamegeZoneをアタッチします。
AnpouleをPrefabフォルダにドラッグ&ドロップします。

最後にampouleGeneratorを実装していきます。
一定時間ごとにAmpouleを生成する機能を持たせたオブジェクトです。
レベルアップのボーナスでこのオブジェクトを生成し、どんどん聖水を投げていきましょう。
using System.Collections;
using System.Collections.Generic;
using UnityEngine;

public class ampouleGenerator : MonoBehaviour
{
    [SerializeField] GameObject AmpoulePrefab;
    float currentTime = 0f;
    public float span = 4f;
    // Start is called before the first frame update
    void Start()
    {

    }

    // Update is called once per frame
    void Update()
    {
        currentTime += Time.deltaTime;
        if (currentTime > span)
        {
            var anpoule = Instantiate(AmpoulePrefab, transform.position, transform.rotation);
            currentTime = 0f;
        }


    }

}
右クリックCreat >create Emptyを生成します。
ampouleGeneratorと名前を付けます。
このScriptをampouleGeneratorにアサインし、AnpoulePrefabにAmpouleをアサインします。
そしてPrefabフォルダに入れます。
AmpouleGeneratorもPrefab化しておきます。
実際にやってみましょう。
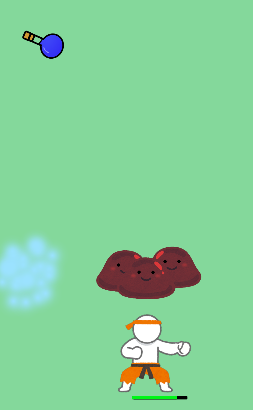
上からアンプルが飛んできてダメージエリアを生成しているでしょうか。
続いては先ほどのLevelupPanelのScriptに追加していきます。
using System.Collections;
using System.Collections.Generic;
using UnityEngine;
using UnityEngine.UI;
public class LevelupPanel : MonoBehaviour
{
    public static LevelupPanel instance;
    Text itemText;
    string ItemName;

    [SerializeField] GameObject LevelUPUI;
    Image itemimage;

    [SerializeField] Sprite imageDrone;
    [SerializeField] Sprite imageAnpoule;
    public int argmentrnd;
    public Image Imagename;
    //public GamemanegerScript GMscript;
    [SerializeField] GameObject drone;
    [SerializeField] GameObject AmpouleGenerator;
    [SerializeField] StatusData statusdata;
    // Start is called before the first frame update
    void Start()
    {
        if (instance == null)
        {
            instance = this;
        }

    }

    // Update is called once per frame
    void Update()
    {

    }


    public void Onclick()
    {
        Imagename = this.gameObject.GetComponent<Image>();
        Debug.Log(Imagename.sprite.name);
        if (Imagename.sprite.name == "ItemPanel0")
        {
            var Drone = Instantiate(drone, transform.position, transform.rotation);//ドローンの生成
        }

        if (Imagename.sprite.name == "ItemPanel1")
        {
            Debug.Log("パンチを選択");
            statusdata.ATK++;
        }

        if (Imagename.sprite.name == "ItemPanel2")
        {
            Debug.Log("聖水を選択");
            var Drone = Instantiate(AmpouleGenerator, transform.position, transform.rotation);//アンプルジェネレーターの生成
        }

        Time.timeScale = 1;
        LevelUPUI.GetComponent<Canvas>().enabled = false;

    }


}
次回はチェストの実装とレベルアップボーナスの変更を行っていきます。
チェストの実装とレベルアップボーナスの追加を行っていきます。


コメント